Yoga For Men – The Top 9 Poses Every Man Should Know
Yoga, an ancient practice that originated in India, has become a popular form of exercise and relaxation for people of all genders around the world.
For men in particular, yoga offers a multitude of benefits, including enhanced flexibility, improved strength, better posture, and stress reduction. Many men might initially shy away from yoga, thinking it’s not challenging enough or that it’s primarily for women, but this couldn’t be further from the truth.
Yoga poses, or asanas, can be incredibly challenging and are designed to work for any body, offering variations to accommodate different levels of fitness and flexibility.
We will explore a few yoga poses that are particularly beneficial for men, especially those who may be dealing with the stiffness associated with sedentary jobs or looking for a way to complement their existing workout routines.
These poses can help to target areas often neglected by men, such as the hips, hamstrings, and shoulders, and can also contribute to improved core strength and balance. Whether you’re a seasoned athlete or someone just beginning your fitness journey, incorporating yoga into your routine can be a game-changer for your overall well-being.
Here are 9 Yoga Poses For Men
1. Downward-Facing Dog (Adho Mukha Svanasana)
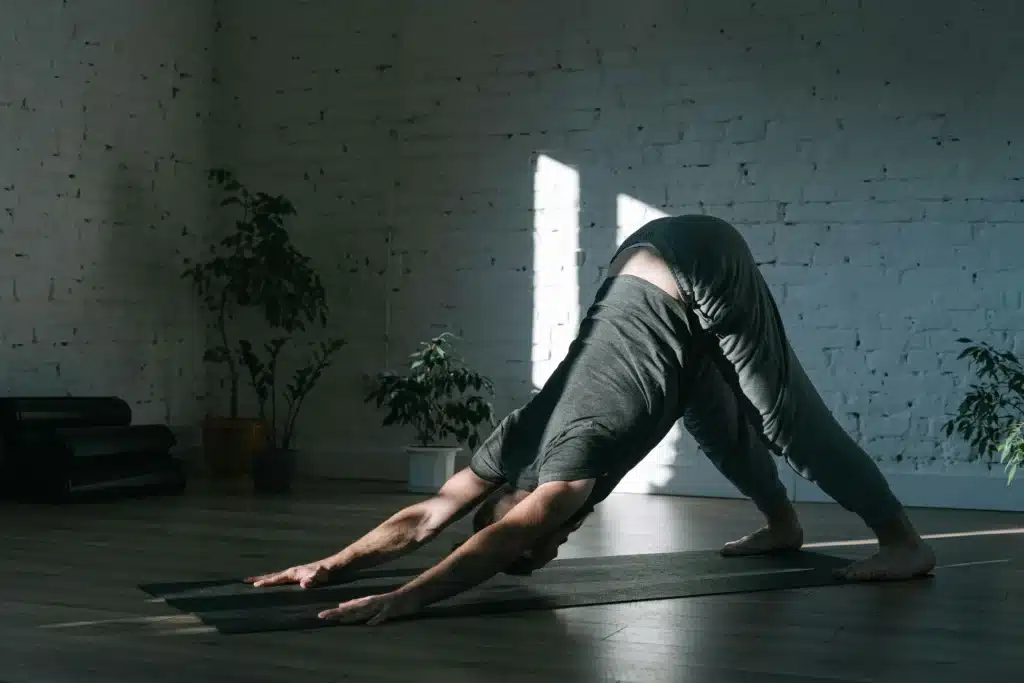
Downward-Facing Dog, or Adho Mukha Svanasana, is a foundational yoga pose used in many yoga practices. It’s named for the way dogs naturally stretch their entire bodies. This pose helps to strengthen the arms, shoulders, and back while stretching the hamstrings, calves, and arches of the feet. It can also help to calm the mind and relieve stress.
Here’s how to practice Downward-Facing Dog:
- Start on your hands and knees, with your wrists under your shoulders and your knees under your hips.
- Spread your fingers wide and press firmly through your palms and knuckles. Distribute the weight evenly across your hands.
- Tuck your toes under and exhale as you lift your knees off the floor. Initially, keep the knees slightly bent and the heels lifted away from the floor.
- Lengthen your spine and tailbone away from the back of your pelvis. As you do this, lift the sitting bones toward the ceiling, and from your inner ankles, draw the inner legs up into the groins.
- Then, with an exhalation, push your top thighs back and stretch your heels onto or down toward the floor. Straighten your knees but be sure not to lock them.
- Firm the outer arms and press the bases of the index fingers actively into the floor. Lift along your inner arms from the wrists to the tops of the shoulders, and firm your shoulder blades against your back. Then, widen them and draw them toward the tailbone.
- Keep your head between your arms without letting it hang, and direct your gaze through your legs or up toward your belly button.
- Stay in this pose anywhere from 1 to 3 minutes.
- To release, exhale as you gently bend your knees and come back to the floor on hands and knees to rest in Child’s Pose, or come to a seated position.
2. Warrior II (Virabhadrasana II)
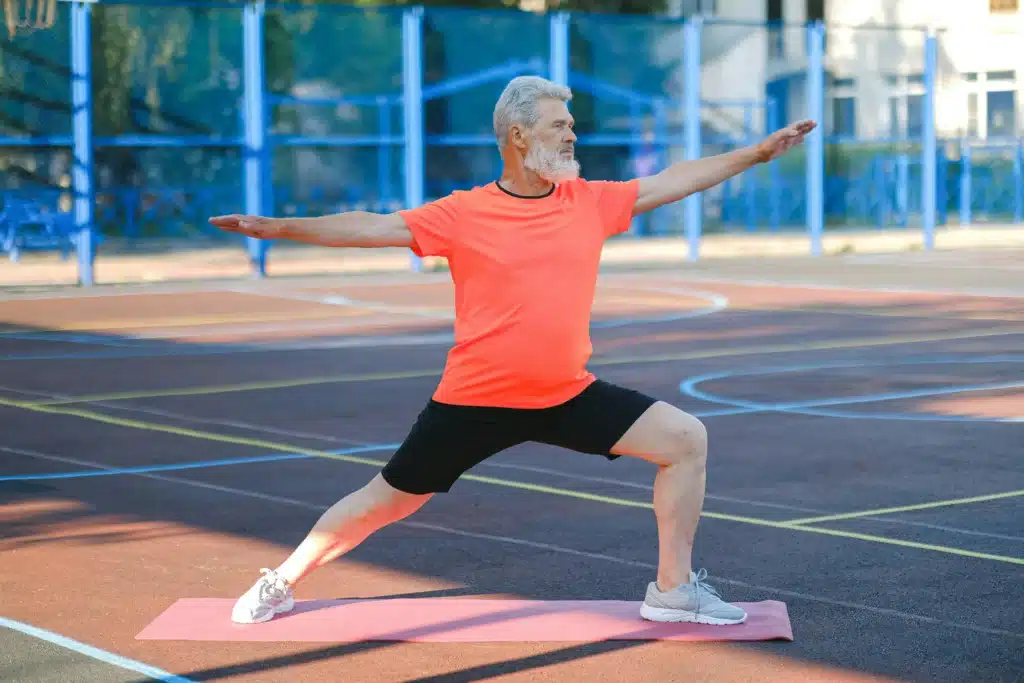
Warrior II, or Virabhadrasana II in Sanskrit, is a common standing yoga pose that emphasizes strength, stability, and concentration. Named after a mythical warrior, Virabhadra, this pose is meant to convey the physical prowess and focus of a warrior.
Here’s how you can get into Warrior II pose:
- Start in Mountain Pose (Tadasana): Stand upright with your feet together, arms by your sides, and weight evenly distributed across both feet.
- Step or Jump Your Feet Apart: Take a wide step (or a small hop) to space your feet about 3 to 4 feet apart. Your heels should be in line with each other.
- Raise Your Arms: Extend your arms out to the sides at shoulder height, palms facing down, actively reaching out with your fingertips.
- Turn Your Feet: Pivot your right foot out 90 degrees so your toes point to the top of the mat. Turn your left foot in about 45 degrees. Ensure that your right knee is aligned with your right ankle.
- Bend Your Right Knee: Exhale as you bend your right knee over your right ankle, so your shin is perpendicular to the floor. Aim to bring your thigh parallel to the floor, but do not allow your right knee to move past your ankle.
- Align Your Torso: Keep your torso perpendicular to the floor, your hips and shoulders aligned with each other, and your chest open. Avoid leaning forward; instead, center your torso right above your hips.
- Gaze Over Your Right Hand: Turn your head to gaze over your right hand. Your eyes should be soft, and your facial muscles relaxed.
- Hold the Pose: Stay in this position for several breaths (usually around 5-10 breaths), maintaining a strong, steady posture. Feel the stretch and strength in your legs, arms, and torso.
- To Release: Inhale and straighten your right leg, lowering your arms to your sides. Pivot your feet to return to the starting position.
- Repeat on the Left Side: Turn your left foot out and your right foot in, bending your left knee over your left ankle. Extend your arms and gaze over your left hand. Hold for the same amount of time as on the first side.
3. Chair Pose (Utkatasana)
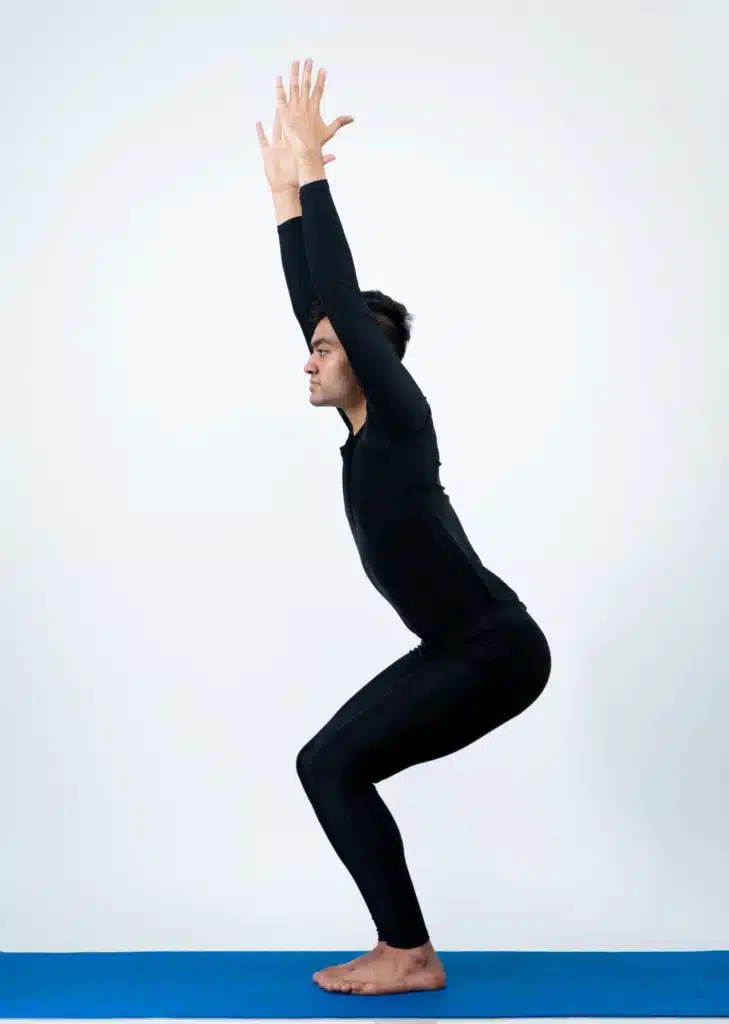
Chair Pose, or Utkatasana (pronounced oot-kah-TAHS-anna), is a standing yoga pose that tones the entire body, particularly the thighs and ankles. The name comes from the Sanskrit words “utkata”, which means “powerful” or “fierce”, and “asana”, which means “pose”.
Here’s how to perform Chair Pose:
- Begin in Tadasana (Mountain Pose). Stand with your feet slightly apart, parallel, and rooted firmly into the ground. Your arms should be at your sides, and your spine should be straight.
- Inhale and raise your arms perpendicular to the floor. Either keep the arms parallel, palms facing inward, or join the palms.
- Exhale and bend your knees, trying to take the thighs as nearly parallel to the floor as possible. The knees will project out over the feet, and your torso will lean slightly forward over the thighs until the front torso forms approximately a right angle with the tops of the thighs.
- Keep the inner thighs parallel to each other and press the heads of the thigh bones down toward the heels.
- Firm your shoulder blades against the back. Take your tailbone down toward the floor and in toward your pubis to keep the lower back long.
- Stay for 30 seconds to a minute. To come out of the pose straighten your knees with an inhalation, lifting strongly through the arms. Exhale and release your arms to your sides into Tadasana.
4. Boat Pose (Navasana)

Boat Pose, or Navasana in Sanskrit, is a common yoga pose that strengthens the core and hip flexors, while also helping to improve balance and digestion. Here’s how you can perform the Boat Pose:
- Start by sitting on the floor with your knees bent and feet flat on the ground.
- Lean back slightly, ensuring that you’re balancing on your sit bones, not your tailbone. Keep your spine straight.
- Lift your feet off the floor. At first, you may keep your knees bent to maintain balance.
- Extend your arms forward, parallel to the floor, with palms facing each other or reaching towards your feet.
- If you can maintain your balance, straighten your legs to a 45-degree angle. Your body should form a ‘V’ shape. Keep your back straight, not rounded.
- Engage your abdominal muscles to support your upper body and legs.
- Hold your gaze forward, and keep your chest lifted to avoid rounding the back.
- Breathe steadily while you hold the pose for about 30 seconds to 1 minute.
- To release the pose, exhale and lower your legs and upper body to the floor.
5. Bridge Pose (Setu Bandhasana)
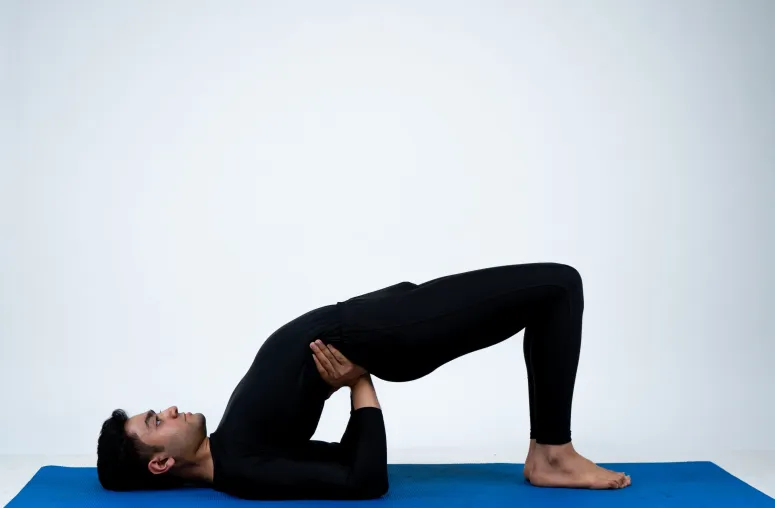
The Bridge Pose, or Setu Bandhasana in Sanskrit, is a common yoga pose that helps to stretch and strengthen the back, chest, and legs. It is a great pose for improving spine flexibility, relieving tension in the upper body, and may help with digestion. Here is a step-by-step guide on how to perform the Bridge Pose:
- Begin by lying on your back on a yoga mat or a comfortable surface. Bend your knees and place your feet flat on the floor, hip-width apart. Make sure your feet are parallel to each other. Your arms should rest alongside your body with your palms facing down.
- Press your feet and arms firmly into the floor. Inhale and gently lift your hips off the mat, rolling the spine off the floor. Push your tailbone toward the pubic bone, keeping the buttocks relaxed. Ensure that your thighs and inner feet remain parallel.
- Clasp your hands together underneath your back and straighten your arms while pressing your fists into the mat. To increase the lift in your hips, shimmy your shoulders underneath your body one at a time, which will help elevate the chest.
- Keep your neck relaxed and maintain a space between the chin and chest to avoid any strain. Your weight should be distributed between your shoulders, arms, and feet.
- Hold the Bridge Pose for 30 seconds to 1 minute, breathing deeply and evenly. Focus on lifting the hips as high as is comfortable, keeping the knees directly over the heels.
- To release the pose, unclasp your hands and slowly lower your spine back to the floor, vertebra by vertebra, starting from the upper back and moving down to the lower back and hips. Once your hips touch the floor, hug your knees into your chest to release any tension in the lower back.
- Rest for a few breaths in a neutral position before moving on to your next pose.
6. Cobra Pose (Bhujangasana)
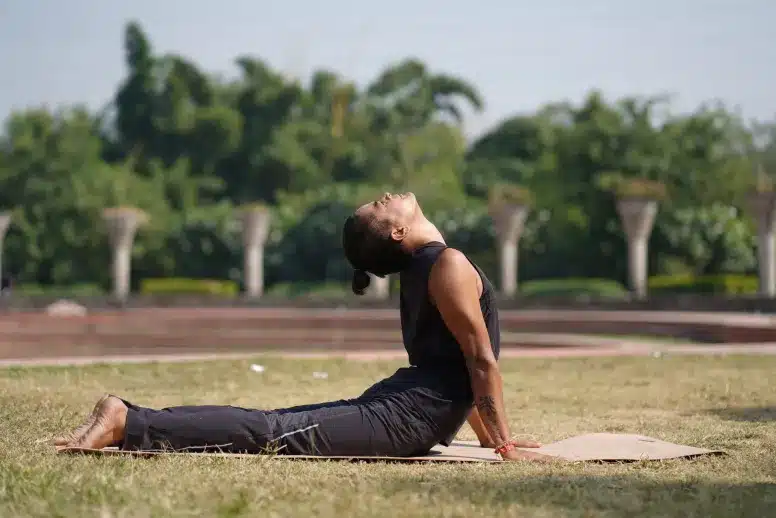
The Cobra Pose, known as Bhujangasana in Sanskrit, is a common yoga pose that stretches and strengthens the spine, shoulders, abdomen, and chest. It is often included in sequences like the Sun Salutation (Surya Namaskar) and is suitable for beginners with some modifications available for those with back issues or less flexibility.
Here’s a step-by-step guide to practicing Cobra Pose:
- Start by lying flat on your stomach on a yoga mat or a comfortable surface. Place your hands on the mat directly under your shoulders with your elbows close to your body.
- Press the tops of your feet, thighs, and hips firmly into the mat. Keep your feet close together with the heels slightly touching if possible.
- As you inhale, begin to straighten your arms to lift your chest off the floor. Go only as high as comfortable while maintaining a connection through your pelvis and legs to the ground. Your elbows can be slightly bent to avoid overextending.
- Engage your lower back, buttocks, and thigh muscles lightly but do not clench them. Keep the shoulders away from your ears by drawing your shoulder blades back and down.
- Keep your gaze forward or slightly upward, careful not to strain your neck. Your neck should be an extension of your spine.
- Hold the pose for 15-30 seconds, breathing smoothly. With practice, you may hold it for up to 2 minutes.
- To release the pose, exhale and gently lower your chest and forehead back to the mat. Relax your arms by your sides.
- After completing the pose, it’s helpful to do a counterpose, such as Child’s Pose (Balasana), to release any tension in the back.
7. Tree Pose (Vrikshasana)
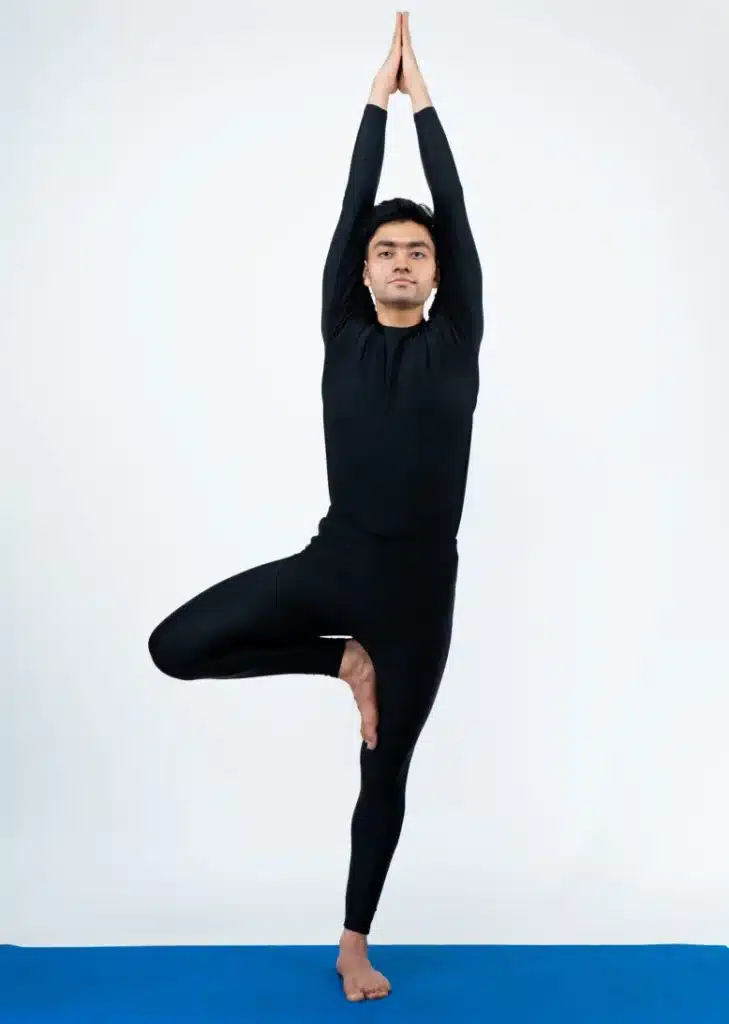
Tree Pose, or Vrikshasana in Sanskrit, is a standing yoga pose that emulates the graceful, steady stance of a tree. This pose helps improve balance, focus, and concentration, while also strengthening the legs and core. Here is how to perform the Tree Pose:
- Start Standing: Begin in Mountain Pose (Tadasana) with your feet together and arms at your sides. Distribute your weight evenly across the soles of both feet.
- Shift Your Weight: Shift your weight onto your left foot, keeping the inner foot firm to the floor, and bend your right knee.
- Position Your Right Foot: Bring your right foot up and place the sole against the inner left thigh. If this is too challenging, you can place it against the inner left calf instead. Avoid placing the foot directly on the knee joint.
- Find Your Balance: Once you are balanced, bring your hands together in prayer position at your chest (Anjali Mudra).
- Raise Your Arms: When you feel stable, extend your arms above your head, keeping them shoulder-width apart or joining the palms together.
- Focus Your Gaze: To help maintain balance, fix your gaze (Drishti) on a still point in front of you.
- Stay in the Pose: Hold the pose for 30 seconds to 1 minute, breathing steadily. With each breath, imagine yourself growing taller, just like a tree.
- Release the Pose: To release the pose, lower your arms and gently release your right leg down to the floor, returning to Mountain Pose. Take a moment to feel the balance in your body.
- Repeat on the Other Side: Repeat the same process on the opposite leg, balancing on your right foot and placing your left foot on your inner thigh or calf.
8. Seated Forward Bend (Paschimottanasana)
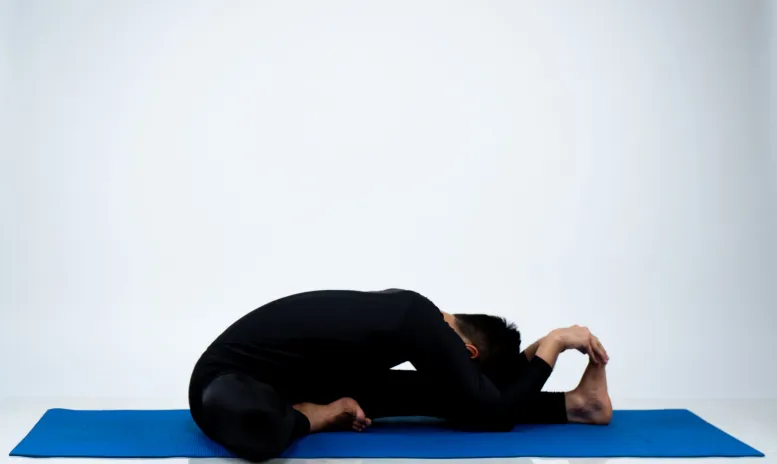
The Seated Forward Bend, or Paschimottanasana in Sanskrit, is a classic yoga pose that stretches the hamstrings, spine, and shoulders. It is often included in yoga sequences for its calming effects and ability to promote flexibility. Here’s a step-by-step guide on how to perform Paschimottanasana:
- Start Seated: Begin in a seated position (Dandasana) with your legs stretched out in front of you. Keep your spine erect and your feet flexed towards you.
- Inhale and Raise Arms: Inhale and raise your arms above your head, lengthening your spine.
- Exhale and Hinge Forward: As you exhale, hinge at the hips and extend your torso over your legs. It’s important to focus on moving forward from the hip joints rather than rounding the lower back.
- Maintain Length in the Spine: Keep the spine long and straight as you bend forward. This will ensure that you are stretching the hamstrings rather than stressing the back. Avoid rounding the spine.
- Grasp Feet or Legs: Reach your hands to your feet, ankles, or shins, wherever your flexibility allows. Don’t force yourself to reach the feet if it causes you to round your back or strain; the goal is to maintain a straight back.
- Deepen the Pose: With each exhale, gently deepen the forward bend. Let your body relax into the pose without forcing it. You should feel a comfortable stretch along the back of your legs and your back.
- Hold the Pose: Maintain the pose for several breaths, ideally between 1-3 minutes. Stay mindful of your breath and keep it steady and even.
- Release from the Pose: To come out of the pose, inhale and gently lift your torso, releasing your arms and sitting back up with a straight spine.
9. Corpse Pose (Savasana)
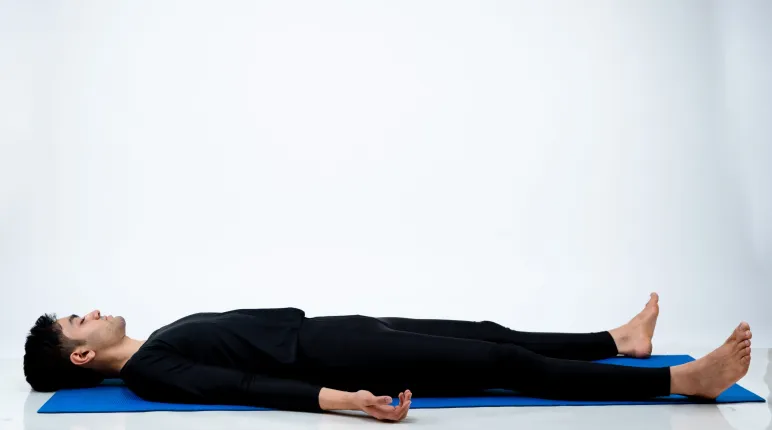
Corpse Pose, or Savasana (pronounced shah-VAHS-uh-nuh), is a classic relaxation yoga pose commonly practiced at the end of a yoga session. The name comes from the Sanskrit words “Shava” meaning “corpse” and “Asana” meaning “pose” or “posture”. Its purpose is to give the body a chance to relax and integrate the benefits of the physical practice. Here’s how to perform Savasana:
- Find a quiet, comfortable space: Choose a flat surface where you can lie down, such as a yoga mat or a soft rug.
- Lie on your back: Gently lower yourself onto your back. Allow your legs to extend straight, letting your feet fall open to either side naturally. Position your arms at your sides, palms facing up, with your fingers naturally curled.
- Adjust for comfort: Make any necessary adjustments to ensure you are comfortable. You can place a pillow under your head, a bolster or rolled blanket under your knees, or a blanket over your body if you’re cold.
- Close your eyes: Allow your eyes to close gently, signaling to your body that it’s time to relax.
- Release tension: Take a few deep breaths, and with each exhale, consciously relax your body. Start from your toes and work your way up, releasing tension in each part of your body.
- Relax your mind: Try to clear your mind of any thoughts, focusing on your breath or a mantra if it helps. The goal is to be in a state of complete rest and stillness, both mentally and physically.
- Stay in the pose: Remain in Savasana for at least 5 to 10 minutes. For a deeper relaxation, you can stay for up to 20 minutes or more.
- Exit the pose gently: When you’re ready to come out of Savasana, do so slowly. Begin by deepening your breath. Then, gently wiggle your fingers and toes to awaken your body. Roll onto one side in the fetal position for a few breaths. When you’re ready, use your hands to help you sit up, coming to a seated position.
The Benefits of Yoga For Men
Yoga is a physical, mental, and spiritual practice that offers a variety of benefits for everyone, including men. While sometimes perceived as a predominantly female activity, yoga is equally beneficial for men, offering a range of health and wellness advantages. Here are some benefits of yoga for men:
- Increased Flexibility: Men often experience tightness in the hips, hamstrings, and shoulders, which can lead to discomfort or injury. Yoga helps to stretch and lengthen these areas, improving overall flexibility and reducing the risk of injury.
- Improved Strength: Yoga isn’t just about flexibility. Many poses require supporting your body weight in challenging ways, which can significantly increase overall strength, particularly in the core, back, and shoulders.
- Stress Reduction: Yoga’s emphasis on breathing and mindfulness can help men reduce stress and anxiety. The meditative aspects of yoga encourage a focus on the present moment, which can help manage stress and promote a sense of calm.
- Enhanced Focus and Concentration: The meditative practices in yoga can improve mental focus and concentration. Regular practice can help clear the mind and increase awareness.
- Better Posture: Many yoga poses focus on alignment and strengthening the muscles around the spine. This can lead to improved posture, which is particularly beneficial for men who sit at desks or engage in repetitive movements that can cause imbalances in the body.
- Cardiovascular Health: Although yoga is often a low-impact exercise, certain styles like Vinyasa or Ashtanga can be quite physically demanding and offer cardiovascular benefits by increasing heart rate.
- Improved Sexual Performance: Some studies suggest that the increased flexibility and improved pelvic muscle tone resulting from yoga can enhance sexual performance and increase pleasure.
- Weight Management: Active styles of yoga, along with the mindfulness practices that can lead to better eating habits, can help in weight management or weight loss efforts.
- Enhanced Athletic Performance: Many athletes incorporate yoga into their training to improve their performance in other sports. It can enhance endurance, strength, and flexibility, which are beneficial in a wide range of sports.
- Improved Digestion: The movements and poses in yoga can help facilitate digestive processes, which can be beneficial for men who suffer from digestive issues.