25 Flexibility-Boosting Yoga Poses for Beginners

Yoga is a great way to stay flexible, both physically and mentally. It’s also a great way for beginners to get started in yoga, as there are plenty of beginner-friendly poses that are easy to learn and perform.
This article will provide an overview of 21 flexibility yoga poses for beginners, along with tips on how to do them correctly. Whether you’re just starting out or looking for a refresher on the basics, these poses will help you build strength and flexibility.
With regular practice, they can help improve posture, balance, and coordination while reducing stress levels. So let’s get started!
1. Cat-Cow
Cat-Cow is a great yoga pose for beginners. It’s easy to do and helps warm up your spine and core muscles.
To get into position, start in tabletop pose: hands directly below your shoulders and knees directly below your hips.
Inhale as you arch your spine, lifting your chest and tailbone towards the sky – this is the Cat portion of the stretch.
As you exhale, reverse the movement, tucking in your chin and tailbone while arching your back downward – this is Cow.
Make sure to keep a flat back throughout the entire stretch; avoid rounding or hunching too much.
Move between Cat and Cow with each inhale and exhale, feeling the muscles in your torso warm up as you continue.
Focus on breathing deeply throughout the exercise to reap maximum benefits from it.
2. Downward Facing Dog
After flowing through Cat-Cow, you may feel more grounded and connected to your body. Now it’s time to make the transition into Downward Facing Dog. This pose is a great way to stretch the spine and legs while also strengthening the arms and shoulders.
Here are some key points to consider when doing this pose:
- Place both hands and feet on the mat, with your hands shoulder-width apart and your feet hip-width apart.
- Lift your hips up toward the ceiling as you press your chest towards your thighs.
- Make sure that you press firmly into all four corners of each hand, creating a solid base for your posture.
It’s important to remember that Downward Facing Dog is an active pose, so take time to explore different areas of the body, making sure not to overstretch or strain any one area. With practice, you’ll be able to gain more control over this posture and reap its many benefits.
3. Wide-Legged Forward Fold
The wide-legged forward fold can be a challenging yet rewarding pose for beginners. It takes practice and concentration to master the proper form, but the effort is worth it.
Starting in a standing position with your feet about three feet apart, inhale deeply as you reach your arms up above your head. Exhale as you gently fold forward from the waist, allowing your arms to dangle toward the ground.
Feel the stretch in your legs, hips and lower back as you bring your chest closer to your thighs. Try not to round your back too much; instead, keep a slight curve in it as you continue folding forward.
If possible, let your fingertips touch the ground or grab onto opposite elbows while keeping your shoulders relaxed and away from your ears. You’ll experience an amazing sensation of lightness in both body and mind when you hold this pose for at least five breaths before slowly coming back up.
4. Seated Forward Fold
Now that you’ve mastered the Wide-Legged Forward Fold, it’s time to move on to another basic yoga pose: the Seated Forward Fold.
This posture is great for stretching out your hamstrings and lower back muscles while reducing stress and improving circulation.
To start this pose, sit on the floor with your legs straight out in front of you.
Take a few deep breaths and then begin to fold forward from your hips as if you were trying to touch your toes. If you can’t go all the way down, just reach as far as you can.
Allow your head and neck to hang freely, feeling the stretch through your back and legs.
Hold this position for a few moments before slowly rolling back up to sitting position and releasing the pose.
5. Half Lord Of The Fishes Pose
Half Lord of the Fishes Pose is a great way to improve flexibility and open up the chest. It’s an easy pose for beginners and can be done in just a few steps:
- Begin by sitting on the floor with your legs extended out in front of you.
- Bend your right knee and place the sole of your right foot onto your left inner thigh as close to your hip joint as possible.
- Place your left arm behind you, stacking it above your right arm, and interlace your fingers behind you.
- Inhale and sit up tall, drawing your shoulder blades together and lifting through the heart center.
- Exhale, hinge forward at the hips, keeping length in both sides of the waist as you fold over your legs. Keep pressure off of the lower back by pressing firmly into feet and hands while maintaining length in front body from pubic bone to breastbone.
Stay here for 10-20 breaths allowing gravity to help open up the chest and shoulders before releasing back to starting position with an inhalation.
This calming pose helps reduce stress levels while improving posture, balance, and flexibility – all important benefits for beginners starting their yoga journey!
6. Seated Spinal Twist
It’s widely accepted that seated spinal twists can be beneficial for beginners in their yoga practice. But just how effective is this pose in providing flexibility?
Research has shown that twisting the torso helps to relax the spine, improving flexibility and range of motion.
Twisting the spine also increases blood flow to your abdominal organs, while stretching the muscles on either side of your torso. This helps to strengthen and tone them, as well as reducing stress and tension from physical activities such as sitting for long periods of time.
The twist also aides in digestion, helping to eliminate toxins from the body.
As you can see, seated spinal twists offer many benefits for those looking to gain more flexibility through their yoga practice. With regular practice, you will start to notice a difference in your overall balance and posture. Furthermore, you may find that it becomes easier to perform more advanced poses with greater ease.
7. Garland Pose
The Garland Pose is a great beginner’s yoga pose that will help to increase your flexibility. It’s also known as Malasana, and it can be done both standing or sitting.
To do the Garland Pose, you should start by standing with your feet slightly wider than hip-width apart. Distribute your weight evenly across both feet and make sure that your toes are pointing forward. Then, gently lower yourself into a squatting position and bring your arms together in front of you at chest level.
Hold this pose for 30 seconds or longer if you can. As you hold the pose, focus on your breathing and try to keep your back straight while keeping your chest out and open. You should also keep your arms close to the body while moving them up and down slightly to get a deeper stretch in the hips and legs.
As you progress in this pose, you may also be able to use a block or bolster underneath you for support if needed — this will help deepen the stretch even further.
8. Reclined Bound Angle Pose
The journey of a beginner in yoga can be compared to the process of decanting a delicate wine. With care and patience, the sediments of inexperience can settle and leave room for the clarity that comes with practice.
Reclined Bound Angle Pose is an excellent position for those just beginning their yogic voyage. Also known as Supta Baddha Konasana, this pose opens up the chest, groin and hips while calming the mind and relieving stress.
It is done by lying on your back with your knees bent outwards toward the sides of your body, feet resting together in a comfortable way. Keeping your back flat against the floor, you may want to place a bolster or folded blankets under your torso for extra support.
The pose should be held for 5-10 minutes for maximum benefit – focusing on your breath will help to deepen relaxation throughout this time.
9. Pigeon Pose
Pigeon Pose is a great way for beginners to practice yoga and improve their flexibility. It’s a simple pose that can be done in any setting, making it ideal for those who want to do yoga at home.
To do the Pigeon Pose, start by getting on your hands and knees. Ensure that your hands are directly under your shoulders and your knees are below your hips. Lift one leg off the floor and slowly bring it up towards your chest, keeping the other leg bent at a ninety degree angle. Make sure you keep your spine straight while doing this pose.
Hold this position for as long as is comfortable then switch legs, repeating the same steps to complete one set of Pigeon Pose. As you become more experienced with this pose, you’ll be able to hold it for longer periods of time and may even be able to add variations like extending both legs or bringing the opposite arm up towards the sky.
With regular practice, Pigeon Pose will help strengthen and stretch your body while improving overall flexibility.
10. Boat Pose
Boat Pose, or Navasana, is a great introductory yoga pose for beginners. It helps to strengthen the core and improve balance. It is also beneficial for digestion and reducing stress.
Here are some helpful tips to get you started:
- Start by sitting on the floor with your legs bent and feet flat on the ground.
- Lean back slightly, so that your torso is at a 45 degree angle with your legs.
- Raise your feet off the ground while keeping your knees bent, so that you form a ‘V’ shape with your body.
- Reach out in front of you with both arms, palms facing down.
Be sure to keep your back straight and chest open throughout this pose. If it becomes too difficult to hold yourself up in this position, simply lower yourself down onto the floor until you feel comfortable again.
With practice and patience, Boat Pose can become an incredibly useful tool for building strength and stability in the body and mind!
11. Bridge Pose
Bridge Pose, also known as Setu Bandha Sarvangasana, is an intermediate-level yoga posture for those with some yoga experience. It helps to strengthen the spine and open up the chest area.
To begin, lie on your back with your arms at your sides and your feet flat on the ground. Next, bend your knees and bring them close to your chest. Place your arms beneath your body and press into the tops of your feet while you lift both hips off the ground. Make sure to keep a straight line between both shoulders and hips while you hold this pose for 10-15 breaths.
In Bridge Pose, it’s important to keep a neutral neck by keeping it aligned with the rest of the body. Also, be sure to engage all core muscles while maintaining a steady breath throughout the pose.
This pose can help increase flexibility in the spine and hip flexors as well as reduce stress in both mind and body. With regular practice, even beginners can enjoy its many benefits.
12. Wheel Pose
The Wheel Pose is an advanced yoga pose that requires a lot of strength and flexibility. It is also known as the Upward Bow or Urdhva Dhanurasana, and it looks like an arch.
To do the Wheel Pose correctly, here are four tips to keep in mind:
- Start by lying flat on your back with your knees bent and feet flat on the floor.
- Place your hands beside your shoulders, facing down with your palms pressing into the ground.
- On an inhale, press firmly into your hands and feet as you lift your hips up towards the sky with a straight back.
- Keep pressing down into both arms to support yourself as you hold this pose for five breaths or more.
This pose is great for strengthening your spine, opening up your chest and upper body, and improving circulation for a full-body workout. It can also help to reduce stress and fatigue while promoting self-confidence and well-being due to its empowering nature.
All of these benefits make the Wheel Pose a great practice for any yoga enthusiast!
13. Half Pigeon
Half pigeon is a deep hip opener that can be difficult for beginners to master. It can seem daunting, but with the right techniques and practice this asana can pay off in big ways.
Alluding to a flock of birds taking flight, half pigeon can help you soar through your yoga practice.
When beginning to learn this pose, it’s important to start from a place of patience and self-love. Slowly ease into the posture and take breaks when necessary.
Focus on maintaining good form; those who rush into the pose risk straining their hips or back muscles. With proper guidance and technique, half pigeon will become more accessible over time, and you’ll be able to reap all its amazing benefits!
14. Cow Face Pose
After mastering the Half Pigeon pose, it’s time to take on Cow Face Pose. This pose is a great way to open up your hips and chest, while also stretching your shoulders and arms.
To get into this pose, start by sitting in a comfortable cross-legged position. Make sure both of your sit bones are firmly rooted into the ground.
Next, bring your right knee over your left knee, stacking them on top of each other. If you can reach it comfortably, try to grab onto your right foot with both hands — this will help you deepen the stretch in the hips and glutes. If not, no worries! You can simply place a block or pillow underneath the outside of your right thigh for support.
Now reach around with your left arm and grab onto the outer edge of your right foot or ankle. Breathe deeply here for several breaths before releasing with an exhale.
Repeat on the opposite side for an even stretch throughout the body.
15. Standing Forward Bend
Standing Forward Bend is a great pose for stretching the entire backside of your body. It helps to relieve tension and tightness in your hamstrings and lower back muscles. Take your time as you come into this pose, focusing on a deep, even breath.
Start by standing tall with your feet hips-width apart, toes pointing forward. Inhale as you hinge at the hips, relaxing your arms down toward the floor. Keeping some weight in your heels, bend forward until you feel a gentle stretch in the backside of your legs. You can use blocks to help support yourself if needed.
To come out of the pose, inhale and slowly roll up one vertebrae at a time until you reach an upright position with a long spine.
This pose is also great for calming the mind – take a few deep breaths here before moving on to other poses in your practice. Allow yourself to let go of any stress or tension that may be present in the body and mind.
Standing Forward Bend can help create space within both physical and mental bodies, leaving you feeling relaxed and rejuvenated for whatever comes next!
16. Standing Half Forward Bend
Have you ever wondered how to bring flexibility into your practice?
Standing Half Forward Bend is a great way to start increasing flexibility in the lower back and hamstrings.
To perform a Standing Half Forward Bend, begin by standing with your feet hip-width distance apart and arms at your sides.
Inhale and raise your arms up overhead while keeping the shoulder blades pressing firmly against your back.
As you exhale, fold forward from the hips, keeping a straight line from your fingertips through the crown of your head.
Allow your arms to hang heavy and sink deeper into the pose as you continue to breathe.
When you reach a comfortable edge, pause for several breaths before slowly coming back up on an inhale.
You can repeat this pose as many times as desired for greater flexibility in the lower back and hamstrings.
17. Triangle Pose
After the Standing Half Forward Bend, we move on to Triangle Pose. This pose helps to increase flexibility in the hips and spine, while strengthening the back and legs. It is a great pose for beginners to practice as it can be done at various levels of difficulty, depending on how far you want to go with it.
Here are some tips that will help you get maximum benefit from Triangle Pose:
- Alignment:
- Make sure your front knee is directly above your ankle, and both feet point straight ahead.
- Keep your shoulder blades down and back.
- Adjustments:
- If you’re feeling tight in the hips or lower back, use a block under your bottom hand to support the weight of your body.
- If you’re feeling any discomfort in your neck or shoulders, place a rolled-up towel between your upper arm and torso for additional support.
As you progress in this pose, take time to focus on your breath and notice any areas where you feel tension in your body. With consistent practice, you will start to feel more open and flexible over time!
18. King Pigeon Pose
King Pigeon Pose, or Eka Pada Rajakapotasana, is a wonderful way to open up the body and increase flexibility. It is an intermediate level posture that requires strength and coordination, as well as patience. If done correctly, this pose can be incredibly meditative and deeply relaxing.
A great way to start learning the King Pigeon Pose is to focus on the breath. Taking slow deep breaths helps to loosen tight muscles and provide the body with an abundance of oxygen. As you inhale, focus on expanding your chest and allowing your back and hips to relax. As you exhale, let go of any tension in your neck, shoulders, and upper body. When ready, begin to slowly lift one leg off the ground while keeping your back straight. Make sure that you keep your core engaged throughout this process so that you stay strong and balanced.
Once in position, draw your attention back to the breath. Feel free to move slowly from side-to-side if it makes you more comfortable or try taking a few long deep breaths here for extra relaxation benefits. Remember to take it slow – progress takes time! With regular practice over time you will be able to experience deeper stretches as your flexibility increases.
19. Revolved Triangle Pose
The Revolved Triangle Pose, or Parivrtta Trikonasana, is an energizing and stimulating twist that will help to increase your flexibility. It stretches the spine, opens up your chest, and gives a deep twist to the obliques.
To get into this pose:
- Start in a Warrior II stance, with your front foot pointed forward and the back foot 45 degrees outwards.
- Reach both arms out parallel to the ground with your palms facing down.
- On an inhale, reach straight up towards the sky with your front arm while turning your torso slightly to face the extended arm.
- Exhale and rotate further as you bring your hand down to rest on top of or just below the knee of your front leg.
- Hold for 3–5 breaths and then slowly return to standing position on an inhale.
To ensure that you are doing this pose correctly:
- Make sure that both hips are facing forward throughout the whole movement.
- Engage your core muscles to keep from collapsing inwards or arching backwards during the twist.
- Use a block or pillow if necessary to help reach the floor without straining your body too much.
Once you get comfortable with this pose, you’ll find that it really helps open up those tight areas in your back and sides!
20. Warrior II Pose
The Warrior II pose is a foundational yoga posture that helps to strengthen and stretch the body. It is a great pose for beginners and experienced yogis alike, as it can help with balance, flexibility, and overall strength.
| Benefit | How to Achieve |
|---|---|
| Strength | Engage core |
| Balance | Extend arms |
| Flexibility | Bend knees |
To perform the Warrior II pose, start by standing with your feet hip-width apart. Then extend your arms out to shoulder height, while engaging your core muscles. Bend your right knee until it is at a 90 degree angle while keeping your left leg straight. Then reach out through both arms, palms facing down, extending fully so that you feel a stretch in your shoulders and chest. Hold this position for 30 seconds or longer if possible before repeating on the other side.
By practicing Warrior II regularly you will begin to notice an increase in strength, flexibility and balance. Your practice will improve over time as you become more familiar with the posture and move into more advanced variations of the pose.
21. Upward Facing Dog Pose
The Upward Facing Dog Pose is a great way to increase flexibility, especially for beginners. This pose helps to open the chest, shoulders and lengthen the spine, making it an excellent stretch that can be done at any time of day.
To properly execute this pose:
- Begin by lying down on your stomach with your arms bent in front of you and your palms flat on the floor.
- Push up with your arms, lifting your upper body off the ground while keeping your legs straight and together.
- Keep pushing up until you feel a comfortable stretch in your back and shoulders, then hold for 10-15 seconds before releasing back down to the floor.
Remember to keep breathing throughout this pose to ensure proper oxygen flow throughout your body.
With regular practice, you’ll be able to hold this pose longer and eventually transition into more advanced poses as you become more flexible!
22. Extended Puppy Pose
After mastering the Upward Facing Dog pose, it’s time to move onto the Extended Puppy Pose. This pose is a beautiful combination of power and relaxation. It allows you to extend your spine while also stretching your arms and shoulders. In this pose, you’ll feel both energized and centered.
| Part of Body | Benefit | Caution |
|---|---|---|
| Back | Lengthens & strengthens spinal muscles | Be mindful of lower back pain or injury |
| Legs & Hips | Opens hips & stretches legs & inner thighs | Avoid overstretching if there are knee injuries or pain in the knees |
| Shoulders & Arms | Stretches chest, shoulders, upper back and arms | Stop if there is any severe shoulder pain or injury |
To begin this pose, start by sitting on your heels with your big toes touching and knees spread wide apart. Place your hands on either side of your feet, palms down, fingertips pointing away from you. Then inhale deeply as you slowly lift up through your belly and chest towards the sky while pressing firmly into your hands to raise the heart center higher. Feel free to remain here for as long as necessary before gently releasing back down to end the pose. As you can see, Extended Puppy Pose offers many benefits that will help you improve flexibility and build strength in an incredibly calming way.
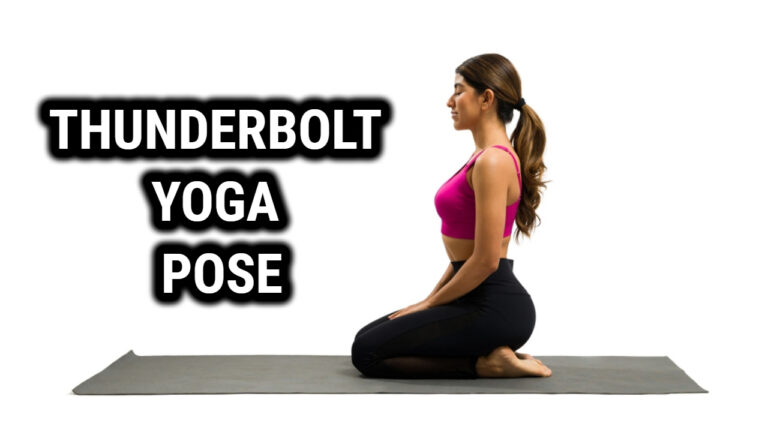
23. Hero Pose
Hero Pose is a great starting point for those just beginning their yoga journey. It’s an easy, comfortable pose that can be modified to fit your body and experience level.
Here are a few benefits of this pose:
- Strengthens the lower back muscles and spine
- Helps to open the inner thighs, hips, and groin
- Calms the mind and helps to reduce stress and anxiety
In Hero Pose you slowly ease yourself into a seated position with your knees bent and your feet flat on the floor. Make sure your knees are wide enough apart for comfort as you rest your torso onto your thighs.
You can also rest your hands on top of your shins or have them pressed together in front of you with thumbs touching at heart center. Stay in the pose for five to ten breaths, allowing yourself to feel supported by the ground beneath you while gently releasing any tension in your body.
24. Lizard Pose
Lizard Pose is one of those yoga poses that can feel like a slippery slope, but the rewards are worth it.
It’s like stretching into a perfect, open book: with each deep breath, the spine and hips open wider until you’re ready to explore the depths of the pose.
The lizard pose is an excellent way to increase flexibility in your hips and legs while also opening up your shoulders and chest.
To get into the pose, start in a runner’s lunge position with your right foot forward, your left knee on the floor and your hands on either side of your right foot.
Slowly move deeper into the stretch by bringing your front knee further back and down towards the floor while pressing your fingertips firmly into the ground.
Take time to find a comfortable position here before pushing yourself further.
You will be amazed at how much more flexible you are after practicing this posture regularly!
25. Camel Pose
The Camel Pose, or Ustrasana, is a posture that stretches the front of the body and strengthens the legs. It’s an intermediate-level pose that offers a great opportunity to build strength and increase flexibility.
Start by kneeling on the floor with your knees hip-width apart. Place your hands on your lower back with your fingers pointing down. Take a deep breath in and tilt your head back as you press your hips forward and arch your spine. Keep pressing your hands into your lower back and extending through the crown of your head until you feel a good stretch in the front of your body.
Hold this pose for up to 30 seconds while taking deep breaths before slowly releasing out of it. As you come out of it, lift yourself up gently with an exhale and relax in Child’s Pose for several breaths before repeating if desired.
Ustrasana can help stretch tight areas like the chest, abdomen, quadriceps, and hip flexors, improving overall mobility in these areas.
Conclusion
Yoga is a great way to increase flexibility and develop strength.
I have shared some beginner poses that are accessible for anyone with any level of experience.
For example, I recently started doing the Lizard Pose which helps stretch out my legs and hips. It’s been a game changer for me as I feel much more flexible after adding it to my routine.
With regular practice, you’ll be surprised by the results you can achieve in terms of your physical and mental wellbeing. So why not give it a try? Your body will thank you!
